vendredi 21 juin 2013

19 MEMORIZED SEQUENCE

MEMORIZED SEQUENCE

by Jean Devriès

Card at Number” is a great theme in Card Magic. The present trick is inspired by H. Trixer's “Photographic memory” described in the basic book of T. Corinda “The Thirteen Steps To Mentalism” (translation in French by R. Vollmer, Ed. Magic Dream). Here is a simple version more natural and very clean. A “mistake” discovered in the counting of the cards finishes persuading the spectator that the performer has a memory out of the ordinary.

Effect. The spectator himself shuffles the deck. Then the cards are ribbon spread, face-up, across the table. The performer learns the card order. After closing the spread and holding the deck, face-down, in hand, he asks the spectator to propose a number between 10 and 30. The performer announces the identity of the card positioned at this number. But it seems that he goes wrong. In reality, a second verification reveals that one card more had been counted by mistake: the announced card was positioned just before it (i.e. exactly at the proposed number) (see Video).


Performance.
Begin announcing you are going to do a special exercise of memory which has required a regular mental preparation.
Give the deck the spectator to shuffle. As you retake the deck, turning it face-up, glimpse the bottom card in second position. Let's assume it is the Five of Hearts (Photo 1). Immediately ribbon spread the cards from left to right across the table, taking care not to expose the memorized card at the right end of the spread. As you point your left forefinger along the ribbon pretend to be learning the card order (Photo 2). Stop after covering about three quarters of the spread only (under the pretext you are not at the top of your form today!...)
Now close the spread and take up the deck, turning it book wise, face-down, into the left hand. Ask the spectator to propose a number between 10 and 30. Let's assume his choice is 19. Then pretend to reflect on the memorized card sequence for a few seconds and announce: “I am sure the card in Nineteenth position is a red Five...I think of the Five of.....Hearts!” As you patter get a left pinky break above the two bottom cards (Photos 3a, b).

The right hand comes over the deck, and, as it grasps the ends in Biddle position, the break is transferred to the right thumb (Photo 3c). Then without faltering, use your left thumb to peel cards, counting them mentally, one card at a time, into the left hand (Photo 4), but at the beginning peel them rapidly enough to not allowing the spectator to follow the process. As you are nearing the proposed number reduce the peeling- rhythm. Arriving at the number minus one (i.e. in the example, 19 – 1 = the 18th card) the left hand deals the corresponding card onto the centrer of the table (Photo 5a). Say: “The Five of Hearts!”, and move back the hand beneath the deck in right hand (Photo 5b). Just at this instant the right thumb releases the two “broken” bottom cards onto the left hand packet (Photos 5c, d). In the continuity point the right hand packet to the tabled card (Photo 5e), inviting the spectator to turn it over for verification. Evidently it is not the good card (for example 9S, Photo 6), and perhaps the spectator will speak ironically about the performer's failure...

Seem to be momentarily confused, and say: “It's impossible!...You had proposed the number Nineteen....,just so!...Let me see...” As you deliver this line put the right hand cards aside onto the table (Photo 6). Pick up the left hand packet from above in Biddle grip (Photo 7). Then, slowly with the left fingers, “draw” the bottom cards to drop them, counting aloud one card at a time, onto the table (Photo 7). The last card will correspond to the spectator's number. Keep it in hand (Photo 8) and say: “There was a mistake...Here is the Nineteenth card!...The Five of Hearts!” Drop the card, face-down, onto the centre of the table. In the continuity retake the wrong card to put it back (face-down) onto the rest of the deck aside and say: “That one is the next card, the Twentieth!”... (Photos 9a, b).


Conclude inviting the spectator to verify the identity of the last dealt card (Photo 10)...

18 MATCHING AGAIN

MATCHING AGAIN

by Jean Devriès


In his “Card Magic” book* Nick Trost describes different versions of other card-magicians on the theme “Matched picture cards”. Instead of the six court pairs, the version proposed here uses any matched pairs of the deck, seven of them. The presentation seems more natural (less strict), leaving apparently greater place of hazard (after mixing the matched pairs, it may happen one of them remains intact). Moreover the spectator is invited to take part in the performance.

Effect. Pairs of matched cards distributed onto to the table are stacked in any order. Then the pile is mixed and cut several times. The performer displays the cards by twos (in their new order), before dropping them (face-down), one pair on another, onto the table. The pairs have appeared made of unmatched cards, except one, which had been discarded aside. Next, the tabled pile cards are dealt by twos, in different places, onto the table. After making “magical circles” with the discarded pair above each of the distributed pairs on table, these ones become made of matched cards again!..(see Video)

Performances.
1°/ From the deck remove seven pairs of matched cards, for example: the black Aces, red Kings, black Jacks, red Tens, black Eights, red Sevens and black Fives. Toss them, face-up, in different places onto the table (Photo 1a). After turning them over, face-down (Photo 1b), permute the pairs, one another, at random. Then, invite the spectator to put them, one on another, in any order (Photo 1c). Pick up the pile and turn it over. Rapidly show the cards spreading them between the hands. As you do, memorize the identity of the card in 5th position from the face (e.g. 5S on Photo 2). After closing the spread, turn the packet, face-down, in left hand.
2°/ Now, "mix" the cards, according to the "pushing off formula 3-2-2-2-5", as explained hereafter. With the left thumb push off three cards (not reversing their order) into the right hand (Photo 3a); then push off two next cards onto the first three (Photo 3b); push off two more, two more, and finally spread, more or less, the last group of five cards and transfer it onto the right hand cards (Photo 3c). Table the packet and you or the spectator cut(s) it several times (complete cuts) (Photo 4).

Re-take the packet and spread the cards, face-up, between the hands, to show their apparent disorder. As you do, discretely, locate the card you had memorized previously, and before closing the spread cut it so that to bring the card in question on back of the packet (Photos 5a, b). Turn the packet, face-down, and as you square it, retain a pinky break below the 3rd top card (Photos 6a, b).
3°/ Now, if you show the cards by twos, the spectator must expect, after the mixing operations previously described, most of the pairs should be made of unmatched cards (different in color, suit, value). To display the pairs you are going to apply the principle of Tom Hubbard's presentation*, but here in a manner which seems more natural, in other words, after showing them, do not use the regular depositing of the pairs onto the table, as it was proposed. Proceed as explained hereafter.

As the right hand in Biddle grip lifts off the three upper cards (above the pinky break) and moves rightwards, the left thumb retains slightly the top card placing it in left-jogged position (Photos 6c, d). Thus, turning the right hand which holds the three cards, palm-up, you can show “two” unmatched cards (e.g. KH and 5S on Photo 6e). Deposit the pair, face-down, just as they are, onto the table (be careful not to disjoint the cards of the double) (Photo 6f).
In the same manner display the next pair (just two cards). But this time the pair will appear made of matched cards (e.g. Black Aces on Photos 7a, b) . Simulate to be slightly surprised and say something as: ”This may occur..,occasionally.., though the cards have been mixed...” Discard the pair in question, throwing it, face-up, aside onto the table.

The next pair will appear made of unmatched cards. After showing it, “drop” the pair on top of the tabled “pair” (In the Tom Hudson's handling the pairs are put in alignment, one on another; here it's not necessary). Continue to display two (unmatched) pairs more and “drop” them on the tabled cards (Photo 8). At this point, three cards remain in your left hand. With the right hand grasp them from above in perfect alignment and use the left thumb to draw the top card leftwards (Photo 9a), thus you show the “ultimate unmatched pair” (e.g. 8C and JC on Photo 9b). Putting it on top of the tabled pile, gather up all the face-down cards, so as to square and dribble them between the hands (Photos 9c, d, e).

4°/ At present deal the face-down cards by twos in different places onto the table. Then pick up the face-up matched card which had been discarded and use it to make “magical circles” above each of the distributed face-down pairs (Photo 10). Slowly, turn over the pairs, one after the other, to reveal they are “become” made of matched cards again ( Photo 11)...


* “The Card Magic of Nick Trost” by Nick Trost (L&L. Publishing).

vendredi 14 juin 2013

17 CURIEUSE DECOUVERTE


CURIEUSE DÉCOUVERTE

par Jean Devriès


Ce tour a été construit autour des principes et méthodes mis en œuvre dans "Impossible Prediction" de Peter Warlock ("One hundred by Warlock", Kaufman and Company) et "Australian Aces" de John Carney ("Carneycopia", L.L. Publishing).

Effet. Quatre cartes choisies librement par le spectateur sont disposées, faces en haut, en une rangée sur le tapis. En arrière de chacune d'elles et à partir de leurs valeurs respectives le présentateur distribue des cartes (faces en bas) jusqu'au nombre "13". Curieusement les cartes à la face des quatre piles ainsi formées appartiennent à la même famille et constituent un Flush Royal incomplet. La carte manquante est trouvée dans le jeu à la position correspondant à la somme des valeurs des cartes choisies. (Voir la Vidéo).


Préparation. Placer sur le dessus du jeu (complet), dans n'importe quel ordre, les cinq cartes d'un Flush Royal (A, R, D, V, 10), par exemple celui à Cœur.

Déroulement du tour.
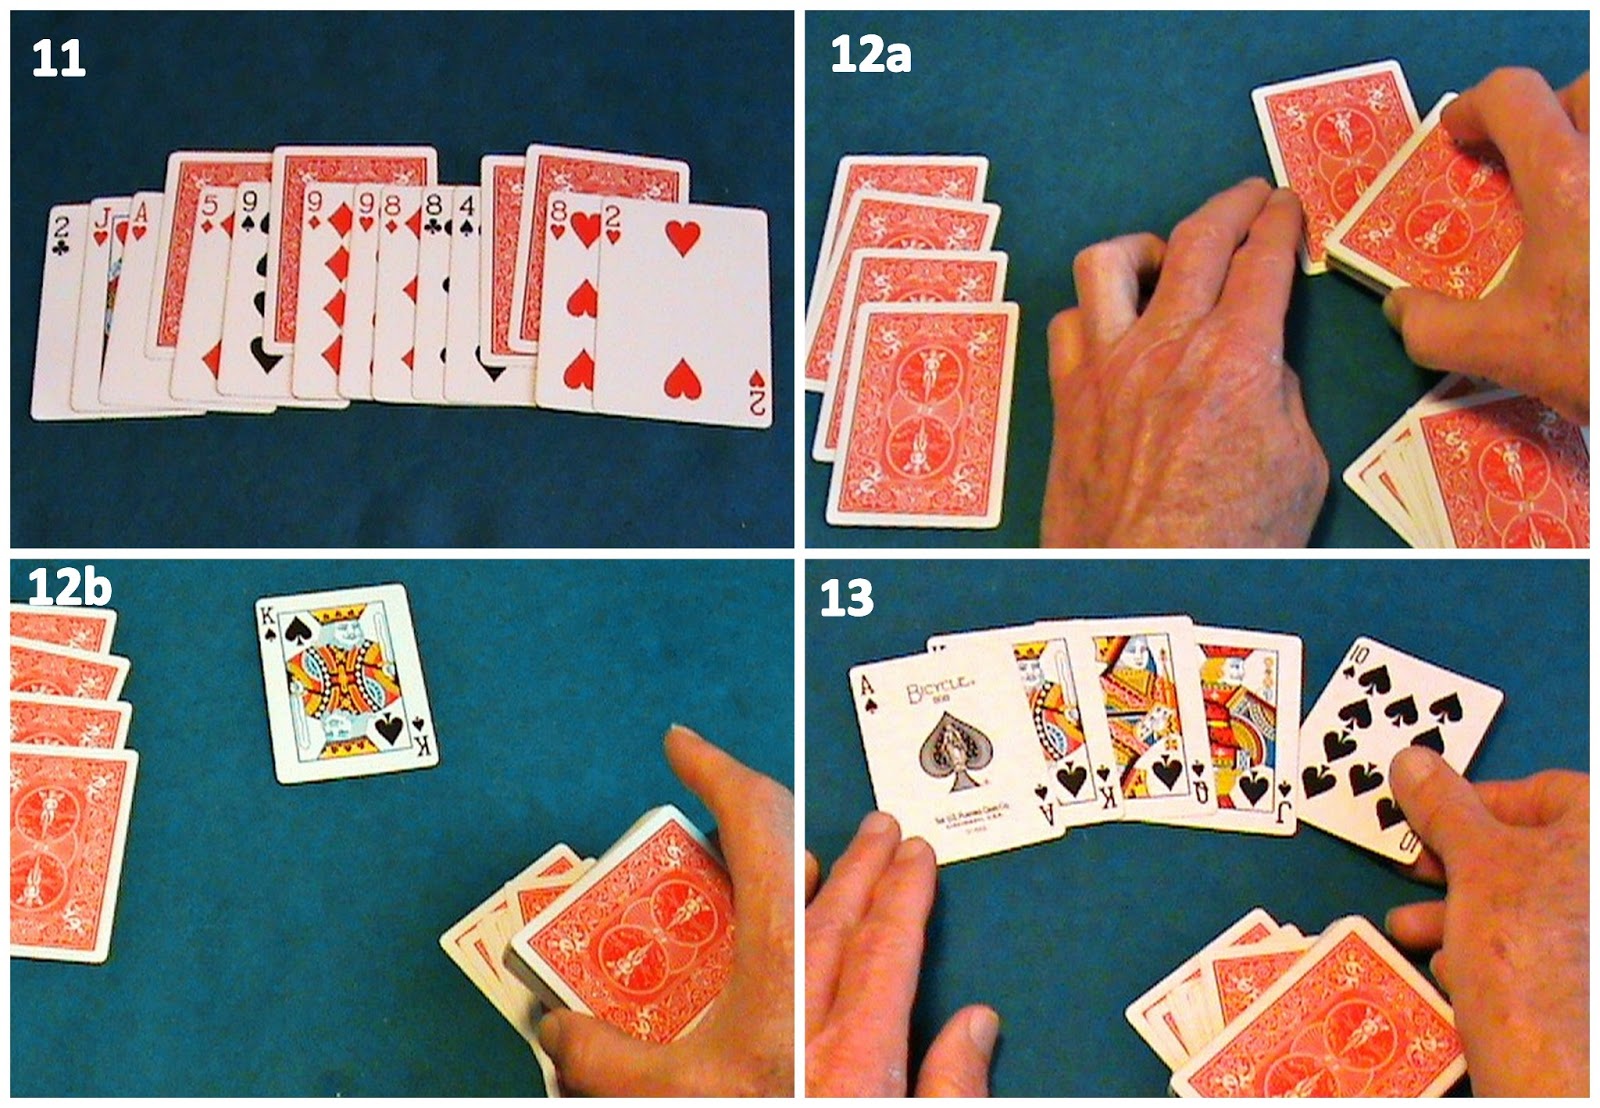
1°/ Etaler le jeu en un ruban, face en bas, sur le tapis. Puis, à l'aide de l'index de la main, le retourner en "vague", en veillant à ne pas exposer les cartes du Flush Royal. Refermer l'étalement. Le jeu étant encore face en haut procéder à un mélange sur table conservant le Flush à sa place. Après égalisation du jeu, le tenir, face en bas, dans la position du mélange usuel. S'adresser au spectateur: « Pour ce tour....je vais vous demander de choisir quelques cartes dans le jeu...» Tout en parlant, peler trois cartes dans la main gauche et sur elles "lancer" le reste du jeu (Photos 1a et b). Aussitôt faire passer les cartes entre les mains et inviter le spectateur à en toucher quatre. Au fur et à mesure les "jeter" sur le tapis (Photos 2a, b et c).
Retourner les cartes sélectionnées, faces en haut (Photo 3). Donner au spectateur la possibilité de changer de cartes s'il le désire. Tout en parlant, tenir le jeu dans la position du mélange usuel. Puis, machinalement peler une carte dans la main gauche (Photo 3), et sur elle "lancer" le reste du jeu. A ce stade les cartes du Flush se trouvent, l'une sur le dessus du jeu, les quatre autres à la face. Disposer les quatre cartes choisies, faces en haut, suivant une rangée horizontale, en veillant à placer à gauche celles de plus faibles valeurs (Photo 4a).
2°/ A présent tenir le jeu dans la position de donne dans la main gauche et s'adresser au spectateur: « Savez-vous combien il y a de cartes, de l'As au Roi, dans chaque famille, Pique, Cœur...?.....Oui, Treize effectivement ! » A l'aide du pouce gauche décaler alors la carte supérieure vers la droite et expliquer que vous allez distribuer des cartes en partant des valeurs de celles se trouvant sur le tapis jusqu'au nombre "13". Par exemple si l'une d'elles est un "Six", 7 cartes seront distribuées en les comptant à haute voix: « Sept, Huit, Neuf,......et Treize » S'il s'agit d'une figure (Valet, Dame ou Roi) sa valeur est comptée comme "Dix", 3 cartes seront donc distribuées. Donner les cartes devant soi, près du bord du tapis, en conservant le pouce droit sur la 1ère déposée pendant un court instant (action permettant de "soulager" une donne du dessous effective). Une fois constituée, déplacer la pile près de la carte concernée (face en haut) de la rangée.
Commencer par la carte à l'extrême gauche de la rangée en procédant comme il vient d'être expliqué. Ici pas de donne du dessous (Photos 4a, b, c et d). Mais le fait que cette carte soit de (plus) faible valeur (voir précédemment §1°) contribue une fois la pile constituée à réduire déjà l'épaisseur du jeu en main, ce qui rendra alors plus facile l'exécution des donnes du dessous ultérieures.
Procéder de la même façon pour les trois cartes suivantes de la rangée. Attention, à présent, au moment de constituer chacune des piles, la 1ère carte doit être distribuée en donne du dessous.
Pour effectuer cette fausse donne, décaler d'abord la carte supérieure du jeu vers la droite à l'aide du pouce gauche. Attirer l'attention sur la valeur de la carte (face en haut) concernée de la rangée (pointer l'index droit sur la carte). Dans le même temps, secrètement, "décrocher" la carte inférieure du jeu à l'aide du majeur gauche, et de manière naturelle (en levant les yeux vers le spectateur pour capter son regard) "donner" la carte en question directement devant soi sur le tapis (Photos 5a, b, c et d). Garder le pouce droit appuyé sur elle un court instant, tout en prononçant son n° d'ordre. Entre temps le pouce gauche aura ramené la carte supérieure à l'alignement avec le jeu (Photo 5d). Continuer en distribuant suivant un rythme régulier les cartes suivantes nécessaires jusqu'au nombre « Treize ». Comme indiqué plus haut déplacer la pile vers la carte (face en haut) correspondante de la rangée (Photos 5e et f).


Au final, chacune des quatre piles constituées (Photo 6) présentera à sa face l'une des cartes du Flush Royal, la cinquième carte du Flush se trouvant encore à la face du paquet en main gauche.
3°/ S'adresser au spectateur: « Voyons maintenant...sur quelles cartes sommes-nous tombés ? » Prendre la pile de droite et l'amener sous le paquet en main gauche. Basculer le tout, face en haut, vers la gauche. Peler la carte alors visible à la face du paquet sur le tapis en mentionnant sa valeur uniquement, par exemple « Une Dame ! » (Photos 7a, b et c). Prendre la pile suivante et la retourner, face en haut, directement sur le paquet en main gauche. Comme précédemment déposer la nouvelle carte visible en nommant sa valeur (Photos 8a, b et c). Et ainsi de suite pour les deux piles restantes. Poser le paquet, face en bas, sur le tapis (Photo 9).


Faire alors remarquer que les quatre distribuées appartiennent à la même famille (Cœur sur la Photo 10). Tout en parlant les ordonner suivant leurs valeurs pour montrer qu'elles constituent l'ébauche d'un Flush Royal au Poker. Il manque une seule carte. La nommer, par exemple « Le Valet de Cœur ! » (Photo 11). Puis attirer à nouveau l'attention du spectateur sur les quatre cartes initialement choisies de la rangée en disant quelque chose du genre: « Vos cartes sont vraiment géniales !...Elles nous ont conduit à cette combinaison de Poker !...Eh bien, nous allons donc les utilisées à nouveau !... » Reprendre le paquet et le tenir, face en bas, dans la main gauche.
Demander au spectateur de calculer la somme des valeurs des cartes en question (par exemple: 3+6+10+8=27, sur les Photos). Puis préciser: « Nous allons donc retirer du jeu des cartes en nombre égal à celui que vous avez trouvé... » A l'aide de la main droite ramasser les cartes de la rangée et les retourner, faces en bas, sur le tapis en disant: « Cela fait déjà Quatre !... » (Photo 12a). Continuer à distribuer sur elles autant de cartes nécessaires pour atteindre le nombre du spectateur (Photo 12b). Conserver en main droite la dernière carte comptée et poser le reste du paquet sur la pile distribuée (Photos 12c et d). Retourner alors la carte retenue en la faisant pivoter lentement sur elle-même (Photo 12e), et la joindre aux quatre autres du Flush Royal, à sa juste place   (Photo 12f)...

jeudi 2 mai 2013

16 REVELATION ORIGINALE


RÉVÉLATION ORIGINALE

par Jean Devriès

Effet. Le présentateur effectue un"mélange Faro sur table" mais en laissant les deux paquets partiellement imbriqués entre eux. Puis il soulève l'ensemble et laisse tomber les cartes par petits groupes sur le tapis, invitant le spectateur à dire "Stop" quand il veut. Celui-ci mémorise alors la carte se trouvant à la face de la portion soulevée. Le jeu est ensuite reconstitué, coupé plusieurs fois, mélangé à nouveau et égalisé. Le présentateur distribue alors 13 cartes (nombre des différentes valeurs de carte) au hasard, provenant des dessus et dessous du jeu. Il les rassemble en un petit paquet et les distribue à nouveau en épelant le nom de la famille de la carte mémorisée (une carte par lettre). La carte suivante est celle du spectateur...(voir le Vidéo-clip).


Déroulement du tour.
1°/ Tout d'abord donner le jeu au spectateur afin qu'il le mélange à sa guise. Poser ensuite le jeu sur le tapis et le partager en deux moitiés sensiblement égales. Effectuer un "mélange Faro sur table" (pas nécessairement parfait), les deux paquets étant laissés imbriqués entre eux environ sur 1/3 de leur longueur (Photos 1a et b).
La main droite, paume vers le bas, saisit alors l'ensemble au niveau de la zone d'imbrication des cartes et le soulève de 5 à 6 cm. Dans un premier temps laisser tomber les cartes rapidement par petits groupes sur le tapis. Saisir à nouveau le jeu tel quel et dire au spectateur: « Vous m'arrêtez quand vous voulez!...»
Laisser tomber les cartes plus lentement. Au "Stop" du spectateur, à l'aide de la main gauche saisir le côté gauche de la portion de jeu restée soulevée: pouce dessus, autres doigts dessous (Photos 2a et b).
Dans cette position il est facile, au toucher du bout des doigts, de savoir de quel côté, gauche ou droit, est située la carte la plus inférieure. Orienter la portion de jeu verticalement, face au spectateur, de sorte que la carte en question soit en haut. Puis la main droite vient tenir le long côté droit entre le pouce au dos et l'index à la face, tandis que les doigts de la main gauche masquent la partie basse Photo 2c). La carte inférieure est ainsi bien visible (en particulier ses deux index). Inviter le spectateur à la mémoriser (par ex. le 9 de Cœur, Photo 2d).
2°/ Baisser les mains pour amener la portion de jeu horizontalement. La maintenir ainsi avec la main droite, tandis que la main gauche va ré-aligner les cartes déplacées de la portion sur le tapis (Photo 3a). A cet instant se rappeler où se trouve positionnée, à gauche ou à droite, la carte supérieure de cette même portion. Effectivement, au moment de reconstituer le jeu, il faudra orienter correctement la portion en main de sorte que la carte du spectateur à sa face coïncide avec la carte supérieure de la portion sur le tapis. En d'autres termes, si la carte supérieure est à gauche, tenir la portion soulevée avec la main gauche (Photos 3b et c), et inversement la tenir avec la main droite, si la carte est à droite.
Par ailleurs, juste au moment de placer la portion en main, décaler légèrement à l'aide du pouce le coin de la carte supérieure de la portion sur le tapis (Photo 4a).
3°/ A présent tenir fermement l'ensemble du jeu de chaque côté à l'aide des deux mains (Photo 4b). Puis "désimbriquer" la moitié de jeu ne renfermant pas la carte décalée (Photo 5a) et l'amener sur le dessus de l'autre moitié (Photos 5b et c). A cet instant la main qui vient d'exécuter cette action demeure en place sur le jeu et le pouce appuie sur le coin de la carte décalée (Photo 6a), créant ainsi une fine ouverture au niveau de la grande tranche du jeu. Cela permet à l'autre main de "tirer" le petit paquet inférieur situé sous l'ouverture et l'amener sur le tout (Photos 6b, c et d). A la suite de ces opérations la carte du spectateur se retrouve à la face du jeu.
4°/ A ce stade il est préférable de poursuivre par un mélange accompagné d'une coupe (carte du spectateur toujours contrôlée à sa place). On peut procéder comme expliqué ci-après (méthode personnelle de l'auteur).
La main droite coupe environ les 2/5 inférieurs du jeu vers la droite (Photo 7a). La main gauche laisse échapper au pouce une dizaine de cartes de son paquet sur le tapis (Photo 7b). Mélanger les cartes de part et d'autre (Photos 7c et d). Puis faire traverser entre eux les deux paquets comme dans le mélange de Dai Vernon ("Push Through Shuffle"). Le paquet initialement à gauche dépassera de la petite tranche droite de l'autre paquet (Photos 8a, b et c).
Le pouce gauche soulève alors le paquet que tient à présent la main gauche, ce qui laissera automatiquement sur le tapis la dizaine de cartes appartenant à l'autre paquet (initialement à gauche, voir précédemment) (Photo 9a). La main droite "tire" ces quelques cartes en bloc les amenant alors sur le tout (Photos 9b, c, d et e). Aussitôt soulever le jeu et laisser tomber les cartes "en pluie" sur le tapis.

5°/ S'adresser alors au spectateur: « Savez-vous combien il y a de cartes dans chacune des quatre familles du jeu...De l'As au Roi ? …Oui, exactement...Treize cartes!..» Prendre alors le jeu par ses petits côtés avec la main droite (tenue "Biddle"), et en le pinçant entre le pouce et le majeur de la main gauche "tirer" les deux cartes, supérieure et inférieure, pour les déposer ensemble sur le tapis, cela en disant: « Deux !» (Photos 10a et b). Continuer de cette façon tout en comptant: «  Quatre, Six,.....Douze ! » Finalement, en distribuant une seule carte sur la pile: «...et Treize ! » (Photo10c). Mettre le reste du jeu à l'écart et rassembler les cartes distribuées (celle du spectateur est à la face du paquet).

6°/ Demander maintenant au spectateur de préciser la famille de sa carte: « Pique, Cœur,.....? » Épeler alors le nom de la famille en distribuant une carte par lettre, face en haut, en une rangée de la droite vers la gauche (par ex. 5 cartes pour COEUR, Photo 11). Peler la carte suivante (face en bas) dans la main droite. La tenir par son grand côté droit, pouce dessus et autres doigts dessous. Se servir de cette carte pour désigner celles de la rangée sur le tapis, en demandant au spectateur s'il reconnaît sa carte parmi elles (Photo 11). Tout en parlant, du bout du majeur gauche sous le paquet en main gauche, "boucler" légèrement la carte inférieure, la dissociant ainsi des autres.
A la suite de la réponse négative du spectateur exécuter une variante du "Mac Switch" de Bruce Cervon (Hard-boiled Mysteries, L.L. Publishing), donnant l'illusion que l'on retourne le paquet en main gauche à l'aide de la carte en main droite, en réalité secrètement échangée avec celle à la face du paquet (carte du spectateur). Brièvement, le principe est le suivant: la main droite amène sa carte sur le paquet et dans le même temps les doigts droits au contact de la carte inférieure ("bouclée") exercent sur celle-ci une pression vers le haut, ce qui a pour effet de basculer en bloc dans la main gauche toutes les cartes, faces en haut, excepté la carte inférieure qui reste retenue, face en bas, pincée entre le pouce et les doigts de la main droite (Photos 12a, b et c).

Déposer le paquet sur le tapis et l'étaler vers la gauche (Photo 12d) tout en s'adressant au spectateur: « Et parmi celles-ci...reconnaissez-vous votre carte ? » Après avoir fait préciser l'identité exacte de la carte, "dramatiquement", retourner celle encore en main droite (par ex. le 9 de Cœur, Photos 13a et b)...

jeudi 25 avril 2013

15 THE EMERGENCY CARD


THE EMERGENCY CARD

by Jean Devriès and Carlos Genoveses

This trick is based on “Twixt the Devil” of J.A.Bannon (Impossibilia, L.L. Publishing), but presented differently. In particular the J.A.Bannon's Mystery Card is replaced by an extra card which appears to be a prediction card in the end of the trick.

Effect. The performer shows a blue backed card and returns it to its place in his shirt pocket. He informs this card would be utilized in case of “emergency”. A card is selected from a red deck and memorized, and then returned to the deck by shuffling. The spectator divides the tabled deck into three parts and turns up their top cards. Using the three face-up cards as indicators the performer tries determining the name of the selected card. But he gives only a neighbouring solution (about colour, suit, value). Looking at his “emergency” card he obtains the right answer. Surprise: both performer's and spectator's cards have the same identity!...(see Video).

Set-up. If your deck is red backed, the back of the extra card must be different: blue for example. Furthermore this “emergency” card is made self-adhesive by application of 3M Remount glue onto the centre of its face (for that, use a hollowed card as a stencil) (Photos 1a, b). Place the extra card into your shirt pocket, face turned towards yourself.

Performance.
Have the spectator to shuffle the red deck and return it to you.
Begin to advertising:”I have, here in my pocket, an “emergency card” which would help me eventually, if I was not successful in doing my trick...” As you speak, with the finger tips take out of your pocket the card in question, showing its blue back, and immediately return it to its place.
Now, spread the cards between the hands and invite the spectator to choose one of them for memorizing (Photo 2). Have the card put back in the deck controlling it on the 2nd position from top. For that you can use the following procedure. Begin an overhand shuffle and invite the spectator to return his card onto the left hand portion. Continue to shuffle the remainder of the deck, but in-jogging the second card (Photos 3a, b, c).
 As you square get a break below the in-jog with the right thumb or the left little finger. At this point, you can double undercut the lower portion to the top, or perform the triple cut in hands as in the video (for the explanations see the trick "6 La Grenouille", $1°). Now the spectator's card is on the 2nd position.
Put the deck face-down onto the table and instruct the spectator to divide it into three successive parts (Photos 4a, b). Remember the place of the original superior part (for example on the right end of the row). The selected card is in this packet (second from the top). Then request the spectator to turn face-up the top card of each packet (Photo 5).
Say: “I am going to need these three cards...” Begin with the central packet: maintaining it against the table with the right hand in Biddle grip, use your thumb at the inner end to lift up the face-up card and transfer it into your left hand (Photo 6a). Look at the spectator and ask him: “Is it your card?” At the same time, move your right hand, naturally, over the original superior packet, and lift up two cards together (the top card and the selected one which is face-down under it) (Photo 6b). Bring the double onto the left hand card. Ask again: “Is it your card?” Finally take off the face-up card of the remaining packet (Photo 6c).
Placing the last card into the left hand retake all the cards. Use the left fingers to draw the inferior and superior cards (Photo 7a). Then turn the hands so that the face of the three cards is oriented towards the spectator (Photo 7b).
Now specify:”I need these cards...They are indicators which can give me certain informations about your card...” While speaking glance (discretely) at the selected card which is visible on the back of the double in right hand. Memorize its identity (for example the 5H, on the Photo 7b). In the action of turning the hands backwards bring the left hand cards onto the double (Photo 7c), thus liberating the left hand so that it can stack the tabled packets (Photos 8a, b). The right hand places its cards over them (Photo 8c) and gathers the whole deck to bring it again into the left hand.

Quietly peel the superior face-up card onto the table, and pretend to be examining it attentively. Then peel the two others near it (Photos 9a, b). A present patter about these three cards according to the identity of the selected card (you had memorized). All is a matter of “comedy” between you and your spectator. Finally announce: “Y think your card was the______,... very likely (?)” Here do not indicate the exact name of the card in question, but one closely related to it (about the colour, suit or/and value).
Evidently your “error” will make the spectator react. Then, look very perplexed and say something like that: “Well...I am obliged..., I need really the help of my emergency card...” Remove the blue backed card out of your shirt pocket and hold it, face turned towards yourself Photo 10a). Looking at it display a “satisfied expression”. Then look at the spectator, and as you put, naturally, the card, face-down, onto the deck in left hand, say: “Now, I'm sure your card was the Five of Hearts!” Here indicate the exact name of the selected card.
Make sure that the blue card is aligned correctly with the deck, then discretely, press on its centre with the left thumb (Photo 10b) so that it adheres to the underlying selected card.
The spectator will confirm your “divination”. Without too waiting, peel the blue card (double) into the right hand, and gently with the finger tips turn it face-up (Photos 11a, b). Table the card near the three others (Photo 11c). To his great surprise, the spectator will realize his card had the same identity as the performer's. Then say: “Really, these cards are genial!”
Now to clean up, use the ultra card to scoop the tabled others. Bring the cards flipping them, face-down, like a book page, onto the deck in left hand (Photos 12a, b). With the left thumb buckle slightly the out left corner of the blue card, so as to dissociate it from the underlying card. Thus the right hand, palm down, can draw the card by the inner end (Photo 13) to replace it, without exposing its face, into the shirt pocket (Photos 14).       

vendredi 19 avril 2013

14 ELIMINATIONS EN CHAÎNE


ELIMINATIONS EN CHAÎNE

par Jean Devriès


Voici un tour reposant sur un principe mathématique déjà utilisé par John Mendoza dans "Mystery of the 19th card" (DVD, L.L. Publishing). Le principe est ici "couvert" par une présentation personnelle originale donnant l'illusion d'une "vraie" magie. Ce tour est entièrement automatique. Il suffit de suivre les explications à la lettre, en y ajoutant un brin de comédie. Au préalable voir le vidéo-clip.


Préparation. Le jeu doit être complet: 52 cartes. Prévoir un stylo (capuchon à barrette) et un petit carré de papier.

Déroulement du tour.
1°/ Après avoir bien mélangé les cartes montrer au spectateur ce qu'il va être amené à faire. Déposer une première carte, face en haut, sur le tapis. Sur cette carte, en fonction de
sa valeur, distribuer autant de cartes (faces en haut) qu'il est nécessaire pour atteindre le 
nombre dix. Par exemple, si la carte initiale est un Quatre (Photo 1), distribuer les suivantes, une à une, en comptant à haute voix: « Cinq, Six,........et Dix » Indiquer au spectateur qu'il devra ainsi constituer d'autres piles jusqu'à épuisement du jeu. Préciser aussi que, si la première carte est un Dix ou une figure (Valet, Dame, Roi), celle-ci est mise à l'écart (ou éventuellement réinsérée dans le jeu).
A la suite de cette démonstration préliminaire ramasser les cartes distribuées pour les ajouter à celles encore en main, puis effectuer à nouveau un mélange. Donner le jeu au spectateur l'invitant à constituer des piles comme expliqué plus haut (Photos 2a, b). A noter qu'entre chaque distribution, le spectateur peut également, s'il le désire, mélanger les cartes tenues en mains. Le plus souvent le spectateur se retrouvera à la fin avec un nombre de cartes ne suffisant pas à constituer une ultime pile. Ajouter ces cartes inutilisées à celles mises à l'écart (les Dix et figures).
2°/ A présent prendre le stylo et examiner "attentivement" les différentes piles distribuées (en général 7 à 10). Faire semblant de réfléchir, puis écrire sur le carré de papier le "message-prédiction" suivant: DISTRIBUER 19 CARTES. Plier le papier et l'accrocher au stylo, qui est alors posé à part sur le tapis.
Poursuivre en invitant le spectateur à retourner trois des piles distribuées (Photo 3). Ramasser les piles restantes et les ajouter aux cartes déjà éliminées. Disposer les trois piles (faces en bas) en une rangée et donner le stylo au spectateur en lui demandant de le poser sur l'une d'entre elles (Photo 4). Retirer le petit papier du stylo en laissant ce dernier sur la pile sélectionnée. Inviter le spectateur à lire, à haute voix, le message écrit (Photo 5a).
Sans attendre prendre toutes les cartes qui jusque là avaient été mises à l'écart. Egaliser le paquet et le donner au spectateur en lui demandant, conformément au message, de distribuer 19 cartes sur le tapis (en les comptant à haute voix) (Photo 5b). Ramasser les cartes distribuées et les mettre, avec le petit papier, sur le côté au bord du tapis. A ce stade le spectateur restera encore en possession de plusieurs cartes.
3°/ Maintenant inviter le spectateur à retourner, face en haut, la carte supérieure des deux piles non-sélectionnées. Examiner "attentivement" les deux cartes en question, puis s'adresser au spectateur: «Êtes-vous prêt pour un nouveau comptage?.. Bien, s'il vous plaît additionnez les valeurs des deux cartes... Bien, maintenant distribuez autant de cartes correspondant à la somme obtenue... » (par exemple, 5+4 = 9 cartes distribuées, Photo 6) Ramasser les cartes nouvellement distribuées et les joindre aux 19 précédentes. Puis, sans commentaire, considérant que les deux cartes, faces en haut, ne sont plus nécessaires, les prendre ainsi que les piles correspondantes et "jeter en vrac" le tout sur les cartes déjà mises à part.
4°/ Attirer alors l'attention du spectateur sur l'unique pile qu'il a sélectionnée, au centre du tapis. Prendre le stylo et s'en servir pour tapoter la carte supérieure, cela en disant: « C'est cette carte qui nous intéresse maintenant!... » (Photo 7)Dégager la carte en la faisant glisser (face en bas) sur le tapis et remettre le stylo sur elle. Tranquillement, ramasser les cartes restantes de la pile et les ajouter aux autres à l'écart (Photo 8).
5°/ Finalement, proposer au spectateur de compter les cartes qui lui restent (par exemple, 6 cartes, Photo 9). Puis annoncer: « On va donc rechercher dans le jeu les cartes ayant comme valeur celle correspondant au nombre obtenu... » Prendre toutes les cartes précédemment éliminées et les faire défiler, faces en haut, entre les mains. Au fur et à mesure "jeter" sur le tapis celles recherchées (ici les Six, Photo 10a). Examiner également les dernières cartes que vient de compter le spectateur. En définitive seront trouvées seulement trois cartes (sur les quatre possibles) répondant à cette même valeur (Photo 10b). Les disposer près de celle du spectateur (encore face en bas) et les nommer à haute voix (Photo 11a). Demander alors au spectateur de préciser, par déduction, l'identité (famille) de la carte manquante, et, après avoir retirer le stylo, l'inviter à retourner lui-même sa carte, ... celle en question...! (Photo 11b).

mercredi 17 avril 2013

13 JUMBLE POKER


JUMBLE POKER

by Jean Devriès

This routine which uses the Bob Hummer's CATO principle (Cut And Turn Over), is inspired by Larry Lorayne's effect called “Hidden Gems” (Genii 2009).

Effect. After a card had been selected by the spectator and placed aside, several cards are dealt, face-up/face-down, onto the table. Then, the dealt packet is cut, top cards are turned over, and so on, several times over, at will. Finally a retro-Faro is executed to increase the “chaotic” condition of the packet. After spreading the cards across the table, only four appear face-down in the ribbon. Surprisingly, these four cards associated to the spectator's one reconstitute the Spade Royal Flush of the deck. The experience is repeated with the same shuffled deck; but now, it is the Diamond Royal Flush which is obtained! (see Video).

Set-up. On top of the deck place the five Spade Royal Flush cards (Ten to Ace, in any order) followed by those of the Diamond ( also in any order).

Performance.
PHASE – I (Spade Royal Flush)
1°/ Begin spreading the deck, face-down, across the table, then using the forefinger turn the ribbon over in wave (Photo 1a). Immediately gather the cards and riffle- shuffle the deck (face-up) maintaining the set-up in place (on back) (Photo 1b). Holding the deck face-down use a swing-cut to centralize the set-up, taking a pinky break above it (Photos 2a, b). Now, spreading the cards towards the spectator, “force” it to touch one of the five cards directly below the break (Spade Royal Flush). Peel the touched card onto the table (Photos 3a, b).
 Be careful to re-take the pinky break when you close the spread into the left hand (Photo 3c). For the moment the spectator does not glance at the identity of his card. Displace the card a little aside.
2°/ Now say to the spectator:”I'm going to complicate things, dealing cards, face-up and face-down” Proceed as follows. With the tip of right fingers into the break flip the upper packet over onto the lower (Photos 4a, b). Then the right hand grasps the deck from above (in Biddle grip). The left hand, slightly squeezing the deck between the thumb and fingers, “draws” the top and bottom cards towards the left, and deposits the two cards, turning them over together, onto the table (Photos 5a, b). Draw an other card pair (Photo 5c) and deposit it directly onto that already on the table. Repeat the previous operations drawing two new pairs, and, turning over one of them before it is deposited onto the tabled cards.
In a continuing action, rapidly spread the deck between the hands to locate the separation point of the two halves. Turn over, face-up, the lower portion and slide it below the upper (Photos 6a, b). Grasp the face-up reconstituted deck from above with the right hand, and, as explained previously, successively draw four card pairs from the deck and drop them, turned over or not, onto the tabled pile (Photos 7a, b). In the course of the dealing, as far possible, take precaution not to expose the bottom card face of each pair (Spade Royal Flush cards).

3°/ Set the rest of the deck, face-down and crosswise, onto the spectator's card (Photo 8). Bring the dealt cards together and square them. Then execute two or three complete cuts of the packet (between hands or on table).
4°/ Continue to “mix” the cards as follows. Hold the packet in left hand dealing grip and use the thumb to push a few cards. The right hand takes 2, 4 or 6 of them off, always in ever number, without inverting their order, and flips all them over directly onto the packet (Photos 9a, b). Immediately complete cut the packet. You can repeat these operations at will. At this point spread the cards between the hands, to show their “jumble condition”. And say:”Now, I'm going to increase more again the disorder of the cards!” As you deliver the last words close back the packet and follow through with a retro-Faro: spread again, out-jogging every other card (Photos 10a, b). Then take the jogged card group off, and flip it over onto the other (Photos 10c, d). To finish execute one or two complete cuts in hands.
As a result of these operations, all the cards are facing in one direction except the four remaining Spade Flush cards. To continue the routine it is necessary to make sure that the four cards in question are face-down. Simply for this, casually spread the top cards: if you see an indifferent card face, the work is done; otherwise, nonchalantly, flip over the packet.
At this point, the spectator should be convinced all the cards are mixed.
5°/ Now ribbon spread the packet across the table (Photo 11). Isolate the face-down cards (4). Bring together the other cards and set them, face-down, aside. Pick up the rest of deck and use it to turn over the spectator's card, face-up, directly onto the table centre. Place the deck onto the previously discarded cards (Photos 12a, b).
Take up the 4 face-down cards and present their faces towards you. Slowly deal the cards, one by one, associating them with the spectator's card in a row, in this way to reconstitute the Spade Royal Flush, according the normal card order (Photo 13)...
PHASE – II (Diamond Royal Flush)
Tell the spectator that you will repeat the effect. Re-take the deck and insert the Flush cards separately into it. At this point the spectator expect the performer is going to produce the Spade Royal Flush again. In reality that will be the Diamond which is (unknown to the spectator!) on top of the deck.
As previously, riffle-shuffle the deck, face-up, maintaining the five cards of the Diamond Flush in place (on back of deck). Here, you are going to execute the “jumble dealing” before the spectator's card choice. But, at first, centralize the set-up: swing-cut the face-down deck and flip the initial lower portion over, face-up, onto the other (no pinky break). Grasp the deck from above with the right hand and you are ready to execute the dealing in question as described in the Phase-I, §2°.
Leave the dealt cards on the table. Four of them proceed from the Diamond Royal Flush. The 5th card of the Flush is still on top of the deck. At present pretend to remember the spectator has not chosen a card yet. Set the deck, face-down, onto the table and invite the spectator to cut a upper portion. Put the remaining portion crosswise above it (“to mark the cut point”) (Photos 14a, b).
Immediately attract spectator's attention to the dealt pile again. Pick up it and continue to “mix” the cards according to the CATO method and the retro-Faro, as already described in Phase-I, §4°. Make sure that the four Diamond Royal Flush cards are face-down in the packet.
Ribbon spread (Photo 15) and take out the 4 face-down cards. After glancing at their identity (Photo 16a) deposit them in a row corresponding to the Royal Flush order onto the table. Of course one card is missing to complete the Flush (Photo 16b).
Usually at this stage of the routine the spectator has forgotten the manner the cut of the deck was done: he mistake the initial upper portion for the the lower (it is the purpose of the “cross force”!). Then, calmly, lift up the present upper portion. Invite the spectator to take up the top card from the tabled packet and to turn it over, revealing it is the card to make up the Diamond Royal Flush (Photo 16c)...